Rank: Advanced Member
Joined: 12/24/2003(UTC)
Posts: 50
Thanks: 1 times
|
Hi Pat, I'm looking for some guidance on importing material.
I have an image of a backsplash tile, which I've run through Photoshop to make the background transparent, so it is just the tile itself. That worked well, I can move the image around in Photoshop and can see there is no background attached to the image.
But when I import the file, I still seem to have a border around it. Any idea what I might be doing wrong?
Also, what file format works best for importing materials?
Thank you!
Tom
|
|
|
|
|
|
Rank: Advanced Member
Joined: 11/1/2002(UTC)
Posts: 7,630
Thanks: 8 times
Was thanked: 141 time(s) in 139 post(s)
|
Hi Tom, In order to import a material you don't need to set a black background. You just need to crop the picture in order to create a seamless texture. In the image below you can see a tile image being cropped in Photoshop. 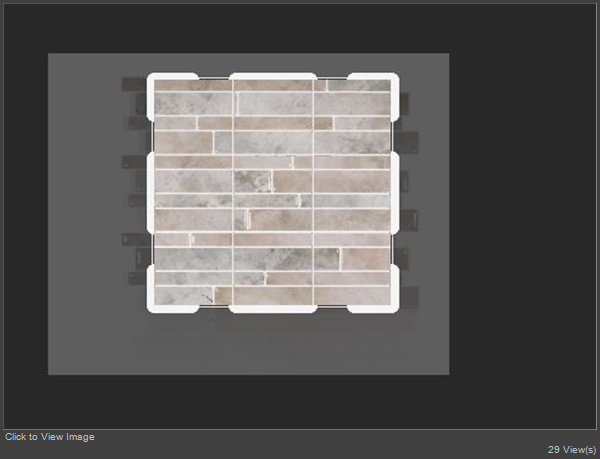 The best formats depend of the original pictures. Try to get pictures in png or tiff formats. Hope this helps. |
|
|
|
|
|
|
Rank: Advanced Member
Joined: 12/24/2003(UTC)
Posts: 50
Thanks: 1 times
|
Hi Pat, As per usual, you are right on top of it! I was trying to import an actual backsplash tile, and they often have "staggered" edges, as the tiles interlock. I simply cropped the tile into a square and it worked great!
So now I'm struggling with how to add an "accent" tile to the shower. Ideally, I'd have one tile (or pattern) on the bottom of the wall (roughly 36"), then an accent tile, which would be 4" or 6" tall, then run all the way to the ceiling with either a different tile or a different pattern (different from the bottom tile).
Any thoughts on how I could do that?
Thanks again for all your support.
Tom
|
|
|
|
|
|
Rank: Advanced Member
Joined: 11/1/2002(UTC)
Posts: 7,630
Thanks: 8 times
Was thanked: 141 time(s) in 139 post(s)
|
Hi Tom, Glad to know that the answer helped!  Regarding the accent => I will be glad to help but I am not sure if I am understanding the issue. Can you share a picture? or a link to a picture in the web? (sorry, the albums are still broken) |
|
|
|
|
|
|
Rank: Advanced Member
Joined: 12/24/2003(UTC)
Posts: 50
Thanks: 1 times
|
Hi Patricia,
I haven't actually "built" the accented wall yet but you answered this question (for me! duh) once before a while ago:
You can use just one wall => create the strips using the Trim Designer Power Tool => apply one strip as baseboard and another as crown molding. In this way, you can apply 3 materials => baseboard, wall and crown molding.
So I THINK I get how to do that now, but I was wondering if there is any new/better/different capabilities?
Basically, I would like to be able to have a wall divided into 3 (sometimes 4) horizontal sections. Each of these stacked numbers would represent one, 8' tall wall:
46"
10"
46"
The bottom 46" would be some kind of tile
The middle 10" would be an "accent tile"
The top 46" would be either the same tile as the bottom, or sometimes a different pattern.
Thanks Patricia!
|
|
|
|
|
|
Rank: Advanced Member
Joined: 11/1/2002(UTC)
Posts: 7,630
Thanks: 8 times
Was thanked: 141 time(s) in 139 post(s)
|
Hi Tom, There are several options: 1 - using the baseboard and crown molding, as explained (and as you described). 2 - You can stack wall segments as you can see in this image of my website. 3 - Using Photoshop or another image program, you can create a custom texture. In the image below (click on the image to open it), you can see the three segments in the texture (outlined in red, green and blue) => Import the texture => remember to set the height as "stretch" 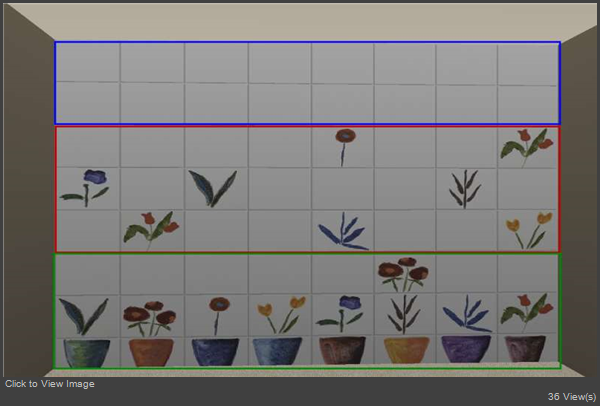 Hope this helps |
|
|
|
|
|
|
Rank: Advanced Member
Joined: 12/24/2003(UTC)
Posts: 50
Thanks: 1 times
|
Hi Patricia, I've been working on this design again, and I've added a base trim to act as my "accent" portion of the wall; I've added texture to it and it worked perfectly. looks just like the accent tile. The only issue is the "base trim" gets placed at the bottom of the wall and I don't see how to select it, in order to raise it up on the wall. Or maybe there is something else I should do as the custom base trim is designed? Not sure...
How do I do that?
Thanks!
Tom
|
|
|
|
|
|
Rank: Advanced Member
Joined: 11/1/2002(UTC)
Posts: 7,630
Thanks: 8 times
Was thanked: 141 time(s) in 139 post(s)
|
Hi Tom,
This issue happens when there is a problem with the wall elevation => check if the wall elevation is matching the elevation of the upper side of the floor.
Hope this helps. |
|
|
|
|
|
|
You cannot post new topics in this forum.
You cannot reply to topics in this forum.
You cannot delete your posts in this forum.
You cannot edit your posts in this forum.
You cannot create polls in this forum.
You cannot vote in polls in this forum.
Important Information:
The Punch Software uses cookies. By continuing to browse this site, you are agreeing to our use of cookies.
More Details
Close
